
As an experienced concrete contractor in Gold Coast, I’ve spent many years working on various residential and commercial projects. In this guide, I’ll share the detailed process of concrete driveway installation, ensuring that every step is covered in depth to help you achieve a durable and aesthetically pleasing driveway.
Table of Contents
- Planning and Preparation
- Excavation
- Formwork
- Sub-Base Installation
- Reinforcement
- Mixing and Pouring Concrete
- Finishing Techniques
- Curing Process

Concrete Driveway Installation
Concrete driveway installation is a meticulous process that requires careful planning and precise execution. Whether you’re enhancing your home’s curb appeal or constructing a reliable surface for your vehicles, understanding each step ensures longevity and quality.
1. Planning and Preparation
A well-thought-out plan is the foundation of a successful concrete driveway installation.
Measuring and Layout:
Measure the area where the driveway will be installed, marking the boundaries clearly with stakes and string. A standard residential driveway should be at least 100mm thick for passenger cars, while heavier vehicles require 150mm.Permits and Regulations:
Check with your local council for necessary permits and compliance with building codes.Site Clearing:
Remove any obstacles, including grass, topsoil, and debris. Ensure no underground utilities are present before excavation.Drainage Considerations:
Plan for proper water runoff by incorporating slight slopes (approximately 1-2% gradient) to prevent pooling and erosion.
2. Excavation
Excavation is crucial to create a stable base for the concrete.
Depth Requirements:
Typically, the soil is excavated to about 200-250mm to accommodate both the sub-base and the concrete slab.Soil Compaction:
Use a plate compactor or hand tamper to compress the soil, reducing the risk of shifting or settling over time.Dealing with Soft Soil:
If the soil is particularly soft or clay-heavy, consider replacing it with a more stable material like compacted gravel.
3. Formwork
Strong and properly set forms ensure the driveway maintains its intended shape.
Material Selection:
Use timber boards (25-50mm thick) or metal forms for durability and straight edges.Form Stability:
Secure the forms with wooden stakes at intervals of 600mm to prevent movement when concrete is poured.Levelling and Alignment:
Ensure the forms are level and follow the desired driveway slope for effective drainage.
4. Sub-Base Installation
The sub-base acts as a supportive layer between the soil and concrete, preventing cracking and shifting.
Material Choice:
Use crushed rock or gravel, with a thickness of 100-150mm, depending on soil conditions and expected load.Compaction Process:
Spread the material evenly and compact it thoroughly using a mechanical compactor.Moisture Considerations:
Dampen the sub-base slightly to enhance compaction but avoid oversaturation.
5. Reinforcement
Reinforcement is essential for strength. Place steel rebar in a grid pattern or use wire mesh. Ensure the reinforcement is elevated slightly so it will be in the middle of the concrete slab, not resting on the sub-base.
Adding reinforcement strengthens the driveway and minimises cracking.
Rebar Grid:
Place steel rebar in a grid pattern (typically 300-450mm spacing) to provide additional tensile strength.Wire Mesh:
Alternatively, use wire mesh reinforcement, ensuring it is slightly elevated using small concrete blocks or plastic chairs.Edge Reinforcement:
Consider additional rebar along the edges to prevent crumbling over time.
6. Mixing and Pouring Concrete
Properly mixed and evenly poured concrete ensures durability and a smooth finish.
Concrete Mix Ratio:
A standard mix includes one part cement, two parts sand, and four parts gravel, with water added gradually until the desired consistency is achieved.Pouring Method:
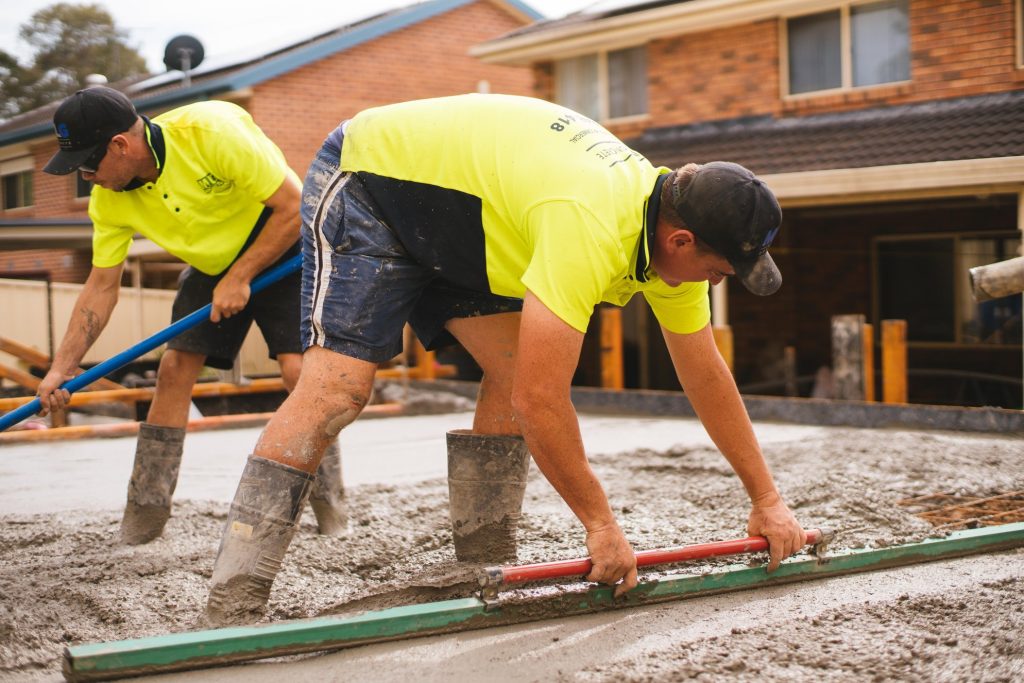
Begin pouring from the furthest point and work towards the exit to avoid stepping on wet concrete.Levelling:
Use a screed board to level the surface and remove excess concrete.Vibration:
Use a concrete vibrator to eliminate air pockets and ensure uniform density.
7. Finishing Techniques
A properly finished surface enhances both aesthetics and functionality.
Floating:
Use a magnesium float to smooth the surface immediately after pouring.Control Joints:
Cut control joints every 1.5 to 3 metres using a groover or saw to allow for natural expansion and contraction.Broom Finish:
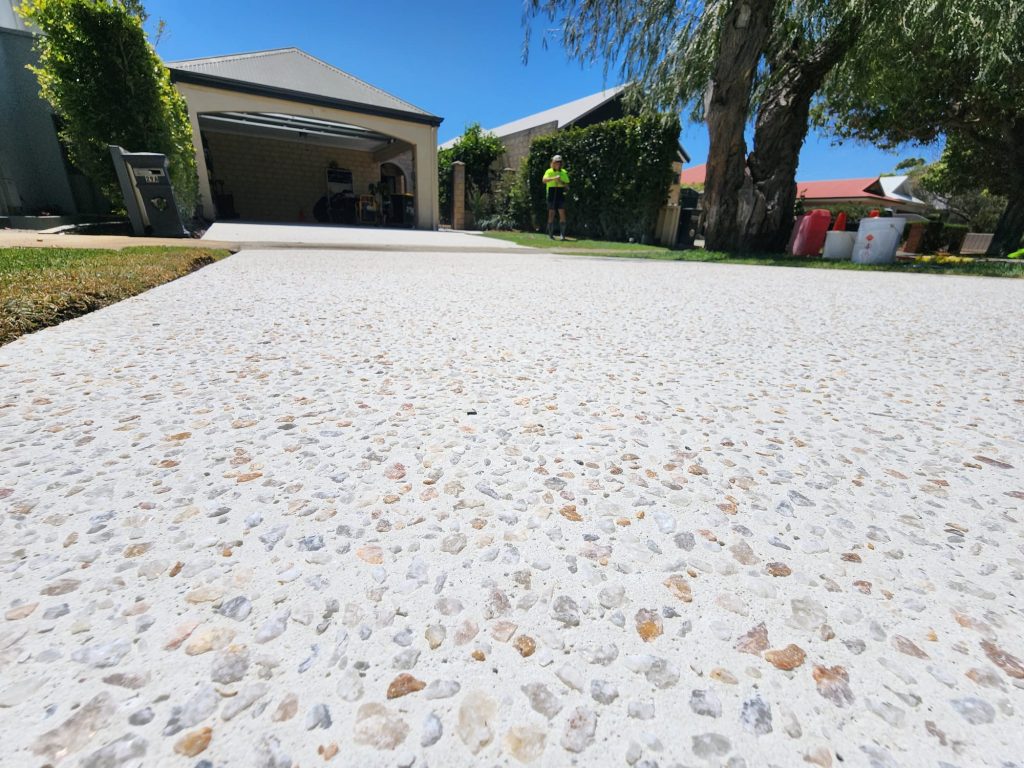
Drag a broom lightly across the surface before the concrete sets to create a slip-resistant texture.Edging:
Use an edging tool along the sides to prevent chipping and improve durability.
8. Curing Process
Proper curing ensures maximum strength and longevity.
Moisture Retention:
Cover the driveway with wet burlap, plastic sheeting, or apply a curing compound to prevent rapid moisture loss.Curing Duration:
Allow at least seven days for the initial curing process, avoiding heavy loads during this time.Protection from Elements:
If rain is expected, use a tarp to shield the surface, and in hot weather, ensure the concrete remains damp to prevent cracking.
A well-executed concrete driveway installation provides a durable and visually appealing result. By following these detailed steps, you can achieve a professional-grade finish that stands the test of time.
Why Choose Us?
- Expertise: With years of experience in concrete driveway installation for both residential and commercial concreting, we deliver top-quality results.
- Quality Materials: We use only the best materials to ensure durability and longevity.
- Attention to Detail: Our meticulous approach guarantees a flawless finish.
- Customer Satisfaction: We prioritise your satisfaction and provide personalised service.
- Free Quotes: Contact us for a free, no-obligation quote.
For more details or to request a free quote, please contact us today.
FAQs
The thickness of a concrete driveway is crucial for its strength and longevity, and it largely depends on the type of traffic it will endure. For standard residential driveways, a minimum thickness of 100mm is recommended, as this provides enough durability for regular vehicles like cars and small utes. However, if you anticipate heavier loads, such as trucks, motorhomes, or caravans, increasing the thickness to 125mm or more will help prevent cracking and premature wear. Additionally, reinforcing mesh or steel bars can be incorporated to further enhance the driveway’s strength and reduce the risk of damage over time.
The sub-base serves as a foundational layer beneath the concrete, ensuring stability and longevity. It is typically made of compacted gravel, crushed rock, or sand, which helps distribute weight evenly and prevents the concrete from shifting, sinking, or cracking. A well-prepared sub-base also aids in proper drainage, preventing water accumulation that could weaken the concrete. Without a strong sub-base, your driveway may become uneven, develop cracks, or suffer from premature deterioration due to soil movement or erosion.
Concrete curing is a process that strengthens the material by allowing it to harden gradually, and while it takes approximately 28 days to fully cure, it becomes usable much earlier. Light foot traffic is generally safe after 24 to 48 hours, while vehicles should wait at least 7 days before driving on the surface. During curing, moisture retention is critical to prevent rapid drying, which can lead to surface cracking. Keeping the concrete damp, using curing compounds, or covering it with plastic sheets helps maintain the right moisture levels for optimal strength development. Even though the concrete continues to gain strength beyond 28 days, proper curing ensures it reaches its maximum durability.
Control joints are an essential part of concrete driveways because they help manage natural expansion and contraction due to temperature changes and moisture variations. Without these joints, the concrete is more likely to crack unpredictably as it undergoes movement. Control joints are strategically placed at specific intervals, typically every 2 to 3 metres for a standard driveway, to direct cracking along pre-determined lines, making them less noticeable and more controlled. By incorporating control joints, you reduce the risk of unsightly random cracks and enhance the long-term durability of your driveway.
Pouring concrete in cold weather is possible, but it requires extra care to ensure it sets and cures properly. Cold temperatures slow down the curing process, and if the concrete freezes before it gains enough strength, it can weaken significantly. To counteract this, warm water can be used in the concrete mix, and chemical admixtures can be added to accelerate curing. Covering the surface with insulated blankets or plastic sheeting helps retain heat and protect the concrete from freezing conditions. If temperatures drop too low, delaying the pour until conditions improve is often the best choice to avoid structural weaknesses.
Maintaining a concrete driveway involves regular cleaning, sealing, and minor repairs to keep it in good condition. Sweeping away dirt, leaves, and debris prevents surface staining, while occasional pressure washing removes built-up grime. Applying a high-quality concrete sealer every two to three years helps protect against moisture penetration, stains, and surface wear, extending the driveway’s lifespan. Avoid using harsh chemicals such as de-icing salts in winter, as they can cause surface deterioration over time. If cracks or chips appear, addressing them early with patching compounds can prevent them from worsening and maintain the driveway’s appearance and durability.
Concrete cracks for various reasons, including natural shrinkage as it dries, excessive weight loads, soil movement, poor installation, and extreme temperature fluctuations. As concrete sets, it loses moisture and slightly contracts, which can cause hairline cracks if not properly managed through control joints. Ground movement due to soil expansion, tree roots, or poor compaction can also lead to larger cracks. Heavy vehicles or improperly distributed loads can put excessive stress on the surface, resulting in fractures. While some minor cracking is inevitable, proper installation, reinforcement, and regular maintenance can significantly reduce the likelihood of major structural issues.