

As an experienced concrete contractor in Gold Coast, I’ve honed my skills over many years of working on various residential and commercial projects, including concrete slabs, patios, driveways, and paths.
Installing a concrete slab can seem daunting, but with proper planning and execution, it’s a manageable task. This guide will walk you through the process step-by-step.
Table of Contents
- Introduction to Concrete Slab Installation
- Planning and Preparation
- Excavation
- Formwork Construction
- Reinforcement
- Mixing and Pouring Concrete
- Finishing Touches

1. Introduction to Concrete Slab Installation
A concrete slab is a fundamental element in many construction projects, providing a sturdy foundation for buildings, patios, driveways, and more. Understanding how to correctly pour a small concrete slab is crucial for ensuring durability and longevity. Proper installation prevents structural issues such as cracking, uneven surfaces, and weak foundations.
Examples:
A homeowner constructing a small patio area for outdoor seating.
A builder laying a slab for a garden shed foundation.
A DIY enthusiast pouring a concrete base for a backyard barbecue setup.
2. Planning and Preparation
The first step in any concrete project is meticulous planning. Measure the area where the concrete slab will be poured, ensuring you have the correct dimensions. Mark the perimeter using stakes and string. This step is crucial for maintaining the slab’s shape and ensuring it’s level.
Examples:
Using a measuring tape and chalk to outline a driveway extension.
Marking the area with wooden stakes and string to keep the slab in a perfect square.
Double-checking dimensions before purchasing materials to avoid wastage.
3. Excavation
Excavation involves digging out the marked area to the required depth, usually around 100mm for a small slab. Remove all grass, rocks, and debris. The ground must be level to provide a stable base for the concrete. Compact the soil using a tamper or roller to prevent settling and cracking in the future.
Examples:
Digging a 100mm deep section for a footpath slab to ensure proper stability.
Removing roots and large stones that could cause uneven settling.
Using a plate compactor to create a firm and solid base for the slab.
4. Formwork Construction
Building formwork involves creating a mould for the concrete using timber. Ensure the formwork is sturdy and the corners are square. Secure the formwork with stakes and nails, checking that it is level. Proper formwork ensures the concrete retains its shape until it sets.
Examples:
Constructing formwork with 100mm x 25mm timber boards for a clean edge.
Using a spirit level to check for any slopes before pouring the concrete.
Reinforcing formwork with extra stakes for larger slabs to prevent movement
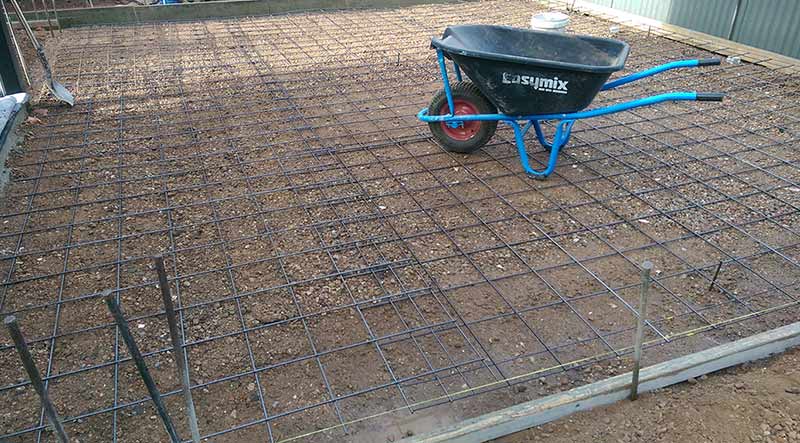
5. Reinforcement
Laying reinforcement, such as a steel mesh, inside the formwork adds strength to the slab. Cut the mesh to fit inside the form, ensuring it doesn’t touch the edges. Elevate the mesh slightly using small concrete blocks, so it’s embedded in the middle of the slab once the concrete is poured.
Examples:
Placing steel mesh in the centre of a garage floor slab for added durability.
Using 50mm concrete spacers to lift the mesh off the ground.
Overlapping mesh sections by at least 150mm to maintain structural integrity.
6. Mixing and Pouring Concrete
Mix the concrete according to the manufacturer’s instructions. The right mix ratio is crucial for strength and durability. Pour the concrete into the formwork, spreading it evenly. Use a shovel to move the concrete into corners and edges, ensuring there are no air pockets for concrete slabs.
Examples:
Mixing a 1:2:4 ratio (cement:sand:gravel) for a strong slab.
Using a wheelbarrow and shovel for small-scale DIY concrete mixing.
Vibrating the concrete using a tamping tool to eliminate air pockets.
7. Finishing Touches
Once the concrete is poured, level it using a screed—a straight edge dragged across the top of the formwork. Smooth the surface with a trowel for a polished finish. Control joints should be added to prevent cracking. Allow the concrete to cure properly, keeping it moist for several days.
Examples:
Using a magnesium float for a smooth and professional finish.
Cutting control joints every 1.5 metres to reduce the risk of cracks.
Covering the slab with plastic sheeting to retain moisture and aid curing.
Reasons to Choose Our Services
- Expertise: Years of experience in both residential and commercial concreting.
- Quality Materials: We use only the best materials to ensure durability.
- Attention to Detail: Every project is completed with precision and care.
- Customer Satisfaction: We prioritize your needs and satisfaction.
- Free Quotes: Contact us for a no-obligation, free quote.
Contact us today for more details or to request a free quote. Our team is here to help with all your concreting needs.
FAQs
To pour a concrete slab successfully, you will need a variety of tools to ensure the job is done properly. A shovel is necessary for excavating and levelling the area, while a wheelbarrow helps transport concrete and materials. A screed board (a straight, flat piece of wood or aluminium) is essential for levelling the wet concrete, ensuring a smooth and even surface. A tamping tool or plate compactor is used to compact the base material, preventing settlement and future cracking. Concrete rakes and floats help distribute and smooth the concrete, while a trowel provides a polished finish. You will also need formwork, such as timber boards, to contain the concrete, along with reinforcing mesh or rebar for added strength. Other useful tools include a spirit level, measuring tape, concrete mixer (or a mixing drill for small jobs), and a curing compound to slow the drying process and enhance durability.
The thickness of a concrete slab depends on its intended use and the weight it needs to support. For standard residential applications, such as footpaths, patios, or shed floors, a minimum thickness of 100mm (10cm) is generally recommended. For driveways or garage floors, which need to support heavier loads like vehicles, a thickness of 125mm to 150mm is better, often reinforced with steel mesh. If the slab is for commercial or industrial use, where it will bear significant weight or heavy machinery, it may need to be 200mm or more, with additional reinforcement such as rebar. Proper preparation of the base, including compacted gravel or crushed rock, is also essential to support the slab and prevent cracking or sinking over time.
Concrete curing is a gradual process, and while it reaches most of its strength within the first seven days, full curing takes about 28 days. The initial setting time is between 24 and 48 hours, during which the concrete should not be walked on or disturbed. After about a week, the slab is typically strong enough for light loads, but it is best to avoid heavy traffic or placing large objects on it until at least 14 days have passed. Keeping the slab moist during curing is crucial to prevent rapid drying, which can lead to cracks. This can be done by spraying it lightly with water, covering it with plastic sheeting, or applying a curing compound.
Pouring concrete directly onto soil is not recommended, as the soil can shift, settle, or absorb moisture unevenly, leading to cracks and an unstable slab. To create a strong and durable foundation, the soil should first be compacted using a plate compactor or hand tamper. Adding a layer of gravel or crushed rock (50-100mm thick) helps improve drainage and prevents moisture-related issues. If the soil is particularly loose or expansive (like clay), additional measures such as a geotextile fabric or deeper compaction may be needed. A vapour barrier, like plastic sheeting, can also be placed between the base and the concrete to reduce moisture absorption and enhance longevity.
The ideal weather for pouring concrete is mild and overcast, with temperatures ranging between 10°C and 25°C. If the weather is too hot, the concrete may dry too quickly, leading to shrinkage cracks and reduced strength. In such cases, it is best to pour early in the morning, use shade or wind barriers, and keep the surface damp during curing. If the weather is too cold (below 5°C), the curing process slows down significantly, increasing the risk of weak concrete or even freezing, which can cause damage. In colder conditions, insulating blankets or heated enclosures may be needed to maintain proper curing temperatures. Rain is another concern, as excessive water can weaken the concrete mix or wash away the surface finish, so checking the weather forecast before starting is essential.
Cracks in concrete can be caused by poor base preparation, rapid drying, excessive load stress, or shrinkage. To minimise the risk, start with a properly compacted base, using gravel or crushed rock to ensure stability. Reinforcement, such as steel mesh or rebar, helps distribute stress and prevents large cracks from forming. Keeping the concrete moist during curing (by spraying it lightly with water or using plastic sheeting) prevents shrinkage cracks caused by rapid drying. Additionally, control joints should be placed strategically, usually every 3-4 metres for slabs, to allow the concrete to expand and contract without cracking in unwanted places. Avoiding heavy loads or movement on the slab during the curing period also helps maintain its integrity.
Formwork should generally be removed after 24 to 48 hours for smaller slabs, but for larger or load-bearing structures, it is best to wait at least 7 days to ensure adequate strength. Removing the formwork too early can cause edges to crumble or the slab to lose its shape, especially if the concrete has not set properly. If the weather is cold, curing can take longer, so it is advisable to wait a bit longer before removing the forms. For vertical structures like columns or walls, waiting at least 3-7 days is recommended to prevent the weight of the structure from causing damage. If in doubt, testing a small section by tapping it gently can help determine if the concrete is strong enough to hold its shape.